In this article we will continue exploring the powers of Views and focus on how to use relationships, contextual filters and rewrite field outputs. In a previous tutorial I showed you how to create a new View and perform basic customizations for it. We’ve seen how to select a display format, which fields to show and how to filter and sort the results.
In this article we will go a bit further and see what relationships and contextual filters are - the two most important options found under the Advanced fieldset at the right of the View edit page. Additionally, we’ll rewrite the output of our fields and combine their values into one.
To begin with, I have a simple article View that just shows the titles. Very easy to set up if you want to follow along. And there are three things I want to achieve going forward:
- Make it so that the View shows also the username of the article author
- Make is so that the View shows only articles authored by the logged in user
- Make it so that the author username shows up in parenthesis after the title
Relationships
First, let’s have the View include the author of the articles. If the View is displaying fields (rather than view modes or anything else), all we have to do is find the field with the author username, right? Wrong. The problem is the following: the node table only contains a reference to the user entity that created the node (in the form of a user ID - uid). So that’s pretty much all we will find if we look for user related fields: Content: Author uid.
What we need to do is use a relationship to the user entity found in the user table. Relationships are basically a fancy way of saying that table A (in our case node) will join with table B (in our case user) in order to retrieve data related to it from there (such as the name of the user and many others). And the join will happen in our case on the uid field which will match in both tables.
So let’s go ahead and add a new relationship of the type Content: Author. Under Identifier, we can put a descriptive name for this relationship like Content Author. The rest we can leave as default.
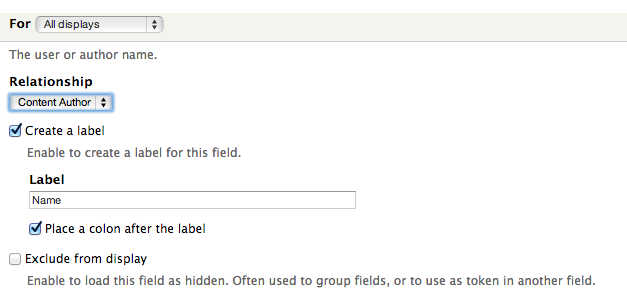
Now if you go and add a new field, you’ll notice many others that relate to the user who authored the content. Go ahead and add the User: Name field. In its settings, you’ll see a Relationship select list at the top where the relationship identifier we just specified is automatically selected. That means this field is being pulled in using that relationship (or table join). Saving the field will now add the username of the author, already visible in the View preview.

You can also chain relationships. For instance, if the user entity has a reference to another table using a unique identifier, you can add a second relationship. It will use the first one and bring in fields from that table. So the end result will be that the View will show fields that relate to the node through the user who authored the node but not strictly from the user table but somewhere else connected to the author. And on and on you can join tables like this.
Contextual filters
Contextual filters are similar to regular filters in that you can use mainly the same fields to filter the records on. Where contextual filters differ greatly is that you do not set the filtering value when you create the View, but it is taken from context.
There are many different contexts a filter value can come from, but mainly it comes from the URL. However, you can instruct Views to look elsewhere for contexts as well - such as the ID of the logged in user.
Continue reading %Drupal 7: Relationships, Contextual Filters and Field Rewriting in Views 3%
more
{ 0 comments... » Drupal 7: Relationships, Contextual Filters and Field Rewriting in Views 3 read them below or add one }
Post a Comment